Creating your First Program
The LASR framework provides an agnostic platform for developers to create contract-based applications. This page outlines a process to deploy your first dAapp using LASR.
Currently, LASR is only available for JavaScript and TypeScript. The example on this page uses Typescript. However, Versatus is constantly working to expand the supported programming languages.
Prerequisites
The only prerequisite to start setting up your project is to have Node.js V18 or newer installed on your system. If you don't have Node.js, you need to install it, otherwise, you can continue with the configuration.
Currently, LASR doesn't support Windows. Refer to the Installing a WSL page if you are trying to deploy a LASR program with a Windows OS.
Hello LASR
The following steps will guide you in creating a hello-lasr program and deploying it. With this, you will begin to understand the power of LASR.
Step 1: Set Up Your Project
With the only prerequisite met, Follow the steps below to set up a new project:
- Create your new project, creating its directory and starting a new Typescript project in it. Run the following to perform all this process:
mkdir your-project-name \
&& cd your-project-name \
&& npm init -y \
&& npm install typescript --save-dev \
&& npx tsc --init
- Install the @versatus/versatus-javascript package:
npm install --save @versatus/versatus-javascript
This package provides essential tools and interfaces for developing programs for the LASR network using Typescript. It contains types, classes, functions, and examples that facilitate the creation of LASR programs. The package also comes with several functions and a CLI. You can use the CLI to initialize, build, deploy, and call programs on the network directly from the terminal.
Step 2: Start the Project
With the project set up, you will now initialize a new LASR project. You can use a variety of templates to perform this. In this tutorial, you will use the hello-lasr:
npx lasrctl init hello-lasr
For more details about the available templates, access the Templates page.
The init command will generate an example program named example-program.ts, located at the root of your project. In addition, it also generates a folder containing example JSON inputs for each method within the inputs directory. These JSON files have examples of what the LASR protocol will send your program. For more information about how the protocol works, access the LASR Protocol page.
Step 3: Set up your Wallet Keys
When the lasrctl command init ran in Step 2, it also generated a .lasr/wallet/keypairs.json file in the project. These addresses are used to connect your account, created in the Creating an Account page to the program you will deploy. You need to replace address and secret_key with your own:
- Access LASR Playground.
- Connect LASR Wallet.
- Copy the address and the LASR Secret Key found on the Playground:
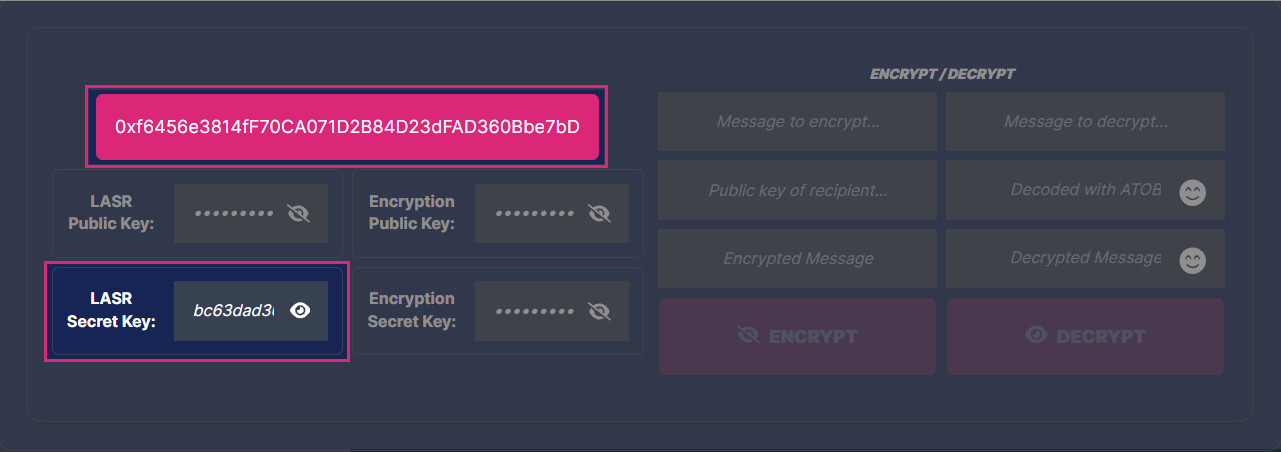
- Replace the
addressand thesecret_keyvalues in thekeypairs.jsonfile with your new values.
It is crucial to keep your keypair.json file secure at all times. This file holds sensitive information that, if exposed, could lead to unauthorized access, loss of funds, or even malicious deployments under your identity.
Therefore, keep in mind the following recommendations:
- Do not share this file with anyone, since it contains unique identifiers that authenticate your transactions and access to your account.
- Avoid committing this file to public repositories to avoid making the file vulnerable to unauthorized access.
- Consider using secret management tools or services. These tools provide a secure way to store sensitive information, such as your
keypair.jsonfile, without exposing it to potential threats.
By doing this, you are ready to continue the deploy process of your first LASR application.
Step 4: Build Your Program
Before deploying your program, you need to compile your TypeScript code into JavaScript. This process uses Webpack to consolidate your entire program into a single, deployable file. If you modify your TypeScript code, remember to rebuild your program to ensure that any changes you've made are incorporated into the version of the program that will be deployed. To do this, use the following command:
npx lasrctl build example-program.ts
The command compiles your TypeScript program and outputs the resulting JavaScript file into the ./build directory.
Note that the ./build directory should not be included in your source control system.
Step 5: Test Your Program
Now that you have built your program, you can validate its performance against sample JSON inputs that it might encounter in real-world scenarios, as defined by the LASR protocol. To facilitate this process, Versatus prepared a set of sample input JSON files located in the ./inputs directory of your project. For more information about how the protocol works, access the LASR Protocol page.
To initiate the testing process, use the following command in your terminal:
npx lasrctl test -b example-program -i example-program-inputs
The lasrctl command iterates through each JSON file in the specified ./example-program-inputs directory, feeding them into your program. The results of these operations are displayed in the terminal, providing a series of messages indicating the validation status of your program's output. Following is an example of what you can expect to see:
Additionally, you can specify individual files to test specific methods, which will also give you a more verbose output.
Validating the PROGRAM OUTPUT...
*******************************
Output is valid ✅
*******************************
Tested input: lasr-hello-token-update.json

*******************************
Output is valid ✅
*******************************
Tested input: lasr-hello-create.json

All tests completed. Summary of results:
Test 1 (lasr-hello-create.json): Passed
Test 2 (lasr-hello-token-update.json): Passed
These messages confirm that your program has successfully processed the sample inputs and produced valid output, as per the LASR protocol's requirements.
With these tests successfully completed, your program is now prepared for deployment on the LASR network, meaning your program is ready to interact with the LASR network. If the messages display errors, you must fix your program before deploying it to ensure it works properly with the LASR network.
Step 6: Deploy Your Program
You can now start the deploy process using the npx lasrctl deploy command. Below is the command you need to run to deploy your hello-lasr application:
npx lasrctl deploy --build example-program --symbol HELLO_WORLD --programName MY_FIRST_PROGRAM
Access the Deploy Configuration page to learn more about the available parameters you can use when deploying your program.
Interacting With Your Program
You can interact with the deployed program using the LASR CLI or through the link received once the deploy command finishes.
-
LASR CLI: It's installed together with @versatus/versatus-javascript package and enables you to interact and test your program using your terminal. To learn more about the available CLI features, access the LASR CLI page.
-
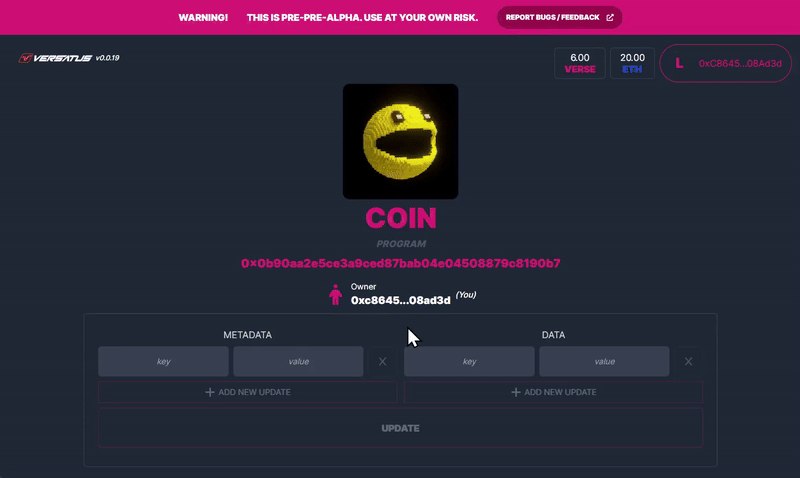
Browser: Once the deploy is finished, it will provide you with a URL that can be used in any web browser to interact with your program. This URL will be similar to the following:
https://playground.versatus.io/programs/0x0b90aa2e5ce3a9ced87bab04e04508879c8190b7
In this tutorial case you don't need VERSE Credits in your wallet. For others that you may require in the future, you can access Versatus Discord server, and request credits through the /faucet <address> command in the faucet channel.
What's Next?
Now that you deployed and tested your first LASR program, you can advance in your journey to create dApps. To better understand how to create and test dApps, access one of the core concepts pages:
In case you want to explore the LASR features, you can access one of the following options: